Plant Collection Procedures
and Specimen Preservation
The following is a guide to the various items of equipment and techniques required to make and preserve plant collections.
Equipment
- Field press:
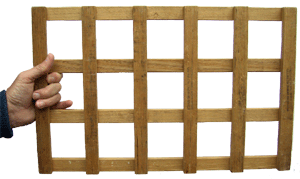
A press typically consists of 2 hardwood frames with each frame made from -
- 4 wood strips c. 20 x 12 x 450 mm and
- 6 wood strips c. 20 x 12 x 300 mm.
Make up as shown below, spacing the strips evenly, and nailing, screwing or riveting securely at intersections. Webbing handle straps on each frame will assist in carrying the press.
You may also use 2 pieces of 12 mm plywood cut to 300 x 450 mm. Some holes drilled in each piece will assist circulation of air.
If using the hardwood frame type of press, it is useful to have 2 inner pieces of corrugated cardboard, 300 x 450 mm. Corrugated cardboard may also be used elsewhere in the press to separate specimens and allow greeter circulation of air.
- Newspaper, cardboard and foam:
A newspaper such as "The Canberra Times", folded in half, is excellent. Corrugated cardboard can be used to separate woody or bulky specimens from delicate ones. Using foam (c. 10 mm thick) in the press results in evenly pressed specimens, especially bulky specimens.
- Press straps:
A pair of strong webbing straps with claw buckles is excellent. Sash cord may also be used. In either case, the minimum length is 1.5 m.
- Field notebook:
A pocket-sized notebook which will stand up to the wet. Use a pencil which is water-proof - both at the time and later.
- Tie-on tags:
Large enough to take your name (or initials) and field number. They may also be used to label collecting bags.
- Clippers:
A pair of secateurs.
- Diggers:
A trowel, preferably with a steel shank.
- Scrapers:
A large spatula is excellent for scraping up mosses and lichens.
- Collecting bags:
Plastic bags, in a couple of sizes, and rubber bands to close them. Small brown paper bags for collecting fruits, seeds and bryophytes.
- Felt tipped pens:
For numbering up bryophyte collections.
- Hand lens:
At least 10x.
- Topographic maps and GPS:
Topographic maps are necessary for locating your position and determining altitude. A GPS (Global Positioning System) unit makes fixing an accurate latitude and longitude easy.
- Safety gear:
A hat, long-sleeved shirt and long trousers to keep the sun off, a jumper and water-proof raincoat to keep the cold and rain off, a first-aid kit, water, food and a trip plan outlining your intended destination/s and expected time of return left with someone who will raise help if necessary.
- Rucksack:
To carry all of the above and collected specimens. A big one!
Collecting
Select vigorous, typical specimens. Avoid insect-damaged plants.
Specimens should be representative of the population, but should include the range of variation of the plants. Roots, bulbs, and other underground parts should be carefully dug up, and the soil removed with care.
Make sure the specimen includes flowers and/or fruits. It may be a good idea to collect extra flowers and fruit for identification purposes.
In collecting large herbs, shrubs and trees, different types of foliage, flowers and fruits should be collected from the same plant. Collect sufficient material to fill an herbarium sheet (c. 450 x 300 mm) and still leave enough room for the label. Plants too large for a single sheet may be divided and pressed as a series of sheets.
Bark and wood samples are often desirable additions when collecting woody plants. There are special requirements for the identification of some plants - see separate list. A Eucalyptus specimen, where possible, should include mature leaves, juvenile leaves, buds, fruits, and bark.
Other general hints for collecting are:
- Bulky plants or parts can often be halved or sliced before pressing. Odd fragments - bark , fruits or seeds - should be kept in numbered or labelled envelopes or packets with the main specimen.
- Very bushy twigs should be pruned to make a flatter specimen, in such a way that it is obvious where pieces have been broken off.
- Spiny plants may first be placed under a board and stood on before pressing to prevent tearing the paper.
- Succulent plants need to be killed first by soaking in methylated spirits for 15-20 minutes. Bulbs should also be killed, or may sprout on herbarium sheet!
- Water plants must be floated out in a dish of water and lifted out on a sheet of stiff white paper slipped under them in the water; dry excess water, then press the plant in the usual way leaving it on the white paper on which it can remain permanently stuck. A piece of waxed paper over the top of the plant will prevent it adhering to the drying paper.
- Tall rosette plants and grasses may be pressed complete by bending them once or more into the shape of a "V", "N" or "M".
- Dioecious plants should be represented by both sexes.
- Palms - several herbarium sheets are necessary to show the various portions of the leaf, inflorescence and fruit of these species. Photographs of the tree and of each part are essential.
-
Cones of some gymnosperms and Pandanaceae may need to be enclosed in a wire mesh to prevent them falling apart.
Pressing and Care of Specimens
Specimens should be pressed as quickly as possible after collection. If this is not possible, specimens may be stored in plastic bags, preferably wrapped in damp (but not wet) papers. Bags should not be packed tightly, and should be kept cool and moist. Make sure that each bag is correctly labelled for locality.
Place each specimen, with numbered tie-on tag attached, in a fold of several sheets of newspaper, and place in the press. If necessary, occasionally add a sheet of corrugated cardboard to act as a ventilator. As you fill the press, try to keep it level to allow even distribution of pressure. This may mean the use of alternate corners of the fold for bulky roots and other parts, or packing around a bulky specimen with foam. Close the press and exert pressure with the straps.
The plants in the press should be dried fairly quickly, in a warm place if possible. The specimens must not be left in damp papers or they will go mouldy. It is therefore neccessary to go through the press daily during the first few days and change the plants into dry newspapers. Then continue to inspect press daily and change newspapers as necessary until the plants are dry.
Delicate plants and petals may be lost in changing and should be kept in tissue-paper (e.g. "Kleenex" or toilet-paper) folders throughout changes. A properly dried plant specimen is brittle.
Field Notes
At the time of collection, a numbered tag should be tied on to the specimen. The best system of collection numbers to use is consecutive - i.e. begin at 1 and go up. Avoid anything elaborate. Each number should refer to 1 collection, and should never be repeated. All duplicates of a collection should bear the same numbers.
The collection is recorded in the field notebook together with information about that collection. As much as possible of the following data should be included:
- Exact locality - a good plain language description, and latitude and longitude.
- Altitude.
- Nature of the habitat - type of soil, topography, slope, aspect.
- Associated species, vegetation type.
- The plant proper - record features which will not be evident from the pressed specimen e.g. whether it is a tree or shrub, height, branching, notes on root system, odour, etc., as well as those features which may be lost on drying e.g. flower colour and odour.
- Date of collection.
![An Australian Government Initiative [logo]](/images/austgovt_canbr_90px.gif)


